

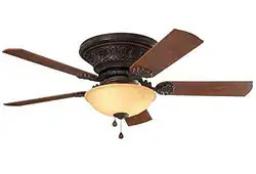
Installing a ceiling fan can instantly improve the comfort and ambiance of any room. Whether you’re trying to cool down your living space, add better lighting, or enhance your home décor, a ceiling fan is one of the most practical upgrades you can make. Luckily, Harbor Breeze ceiling fans are designed to make this process simple and enjoyable for homeowners of all experience levels. With user-friendly features and straightforward instructions, anyone can install a Harbor Breeze fan confidently — no professional help required.
Let’s explore how to install your Harbor Breeze fan easily and safely, and why this trusted brand continues to be a favorite among homeowners.
Before starting the installation, gather the essential tools and materials. You’ll need:
A screwdriver (Phillips and flathead)
Pliers
Wire connectors
A ladder
A voltage tester
Electrical tape
Make sure to switch off the power at the circuit breaker to the area where you’ll be working. Safety is the first and most important step in any installation project. Once the power is off, clear your workspace and unpack your Harbor Breeze ceiling fan to ensure all parts are included.
The mounting bracket is the foundation for your fan’s stability. Begin by removing any old fixture or fan. Then, check that the electrical box in your ceiling is rated for ceiling fan installation — this ensures it can support the fan’s weight and motion. Attach the Harbor Breeze mounting bracket securely to the electrical box using the provided screws. Make sure it’s tightly fastened, as a solid mount prevents future wobbling or noise.
Harbor Breeze makes assembly simple, even for first-time installers. Start by attaching the downrod (if your model has one) to the motor housing, then secure it tightly with the locking pin or screws. Next, attach the fan blades. Many Harbor Breeze fans feature Quick Install blades, which snap into place without requiring multiple screws, saving time and effort.
Once your fan motor and blades are assembled, prepare to connect the electrical wiring.
Wiring can sound intimidating, but Harbor Breeze fans make it easy with color-coded wires and clear instructions. Match the fan wires to the ceiling wires as follows:
Black (fan power) connects to black (ceiling hot)
White (neutral) connects to white (ceiling neutral)
Green or bare copper (ground) connects to the ceiling ground wire
If your fan includes a remote receiver, install it between the ceiling and fan wires as described in the manual. After connecting all wires, secure them with wire connectors and wrap with electrical tape for safety.
In the middle of your installation, you’ll likely notice how effortless the process feels — and that’s one of the many reasons homeowners prefer Harbor Breeze. Here’s why this brand stands out:
1. Hassle-Free Installation:
Harbor Breeze fans are specifically engineered with homeowners in mind. Features like Quick Connect blades, preassembled parts, and step-by-step manuals make the installation process fast and frustration-free. Even if it’s your first time, you can achieve a professional-quality setup.
2. Exceptional Energy Efficiency:
Each Harbor Breeze fan is designed to maximize airflow while minimizing power consumption. Many models are ENERGY STAR® certified, providing excellent performance while lowering your energy bills.
3. Stylish Designs for Every Home:
Whether your taste is modern, rustic, or traditional, Harbor Breeze offers a wide variety of designs, finishes, and sizes to complement any décor. From brushed nickel to matte black, every model combines elegance with functionality.
4. Quiet and Reliable Performance:
Equipped with advanced, whisper-quiet motors, Harbor Breeze fans deliver strong airflow without noise. Their durable construction ensures long-lasting operation, making them a smart investment for your home.
5. Affordable Quality:
Harbor Breeze offers high-end features and designs at prices that fit every budget. You get the perfect balance of performance, durability, and value — making it a top choice among homeowners nationwide.
Once the wiring is done, lift the fan motor into the mounting bracket and lock it in place. Double-check that all screws are tightened securely. Next, attach the light kit (if your model includes one). Harbor Breeze light kits often feature integrated LED systems, providing bright illumination with minimal energy use.
Before turning the power back on, make sure all parts are properly secured and that no wires are exposed.
Restore power at the circuit breaker and test your fan. Check each speed setting to ensure smooth operation. If your fan includes a remote control, pair it and verify that both the fan and light respond correctly. In case of any wobbling, use the balancing kit provided in the box to fine-tune the fan blades for stable performance.
Once your Harbor Breeze fan is running perfectly, a bit of regular maintenance will keep it that way. Dust the blades monthly to maintain airflow efficiency, and check the mounting screws once or twice a year to keep the fan stable. With proper care, your fan will perform reliably for many years.
Installing a Harbor Breeze ceiling fan is a rewarding DIY project that transforms the comfort, style, and energy efficiency of your home. With clear instructions, smart engineering, and easy-to-install features, Harbor Breeze ensures homeowners can complete the job quickly and safely.
Whether you’re refreshing your living room or adding comfort to your bedroom, Harbor Breeze fans offer the perfect combination of quality, beauty, and simplicity. With just a few tools and a little time, you can enjoy a professional-looking installation that enhances your home’s comfort for years to come.
| No comments yet. Be the first. |
